Shelly Home Assistant-compatible relay
Posted on Thu 19 September 2024 in Making
Using a Shelly 1 Mini Gen 3 as an MQTT-controllable relay
For my Christmas lights, I've been using homemade MQTT-controllable relays. I've been wiring up an ESP2866, a relay, and a AC-DC converter. While this works, it's a bit of a rat's nest of wiring. So I decided to try using a Shelly 1 Mini Gen 3 relay instead. These package basically the same components I've been using into a small, self-contained little box with convenient wiring connections. In my bench tests so far, I think this will work great.
In this post, I'll explain how I wired up the Shelly and how I can control it using MQTT.
Wiring it up
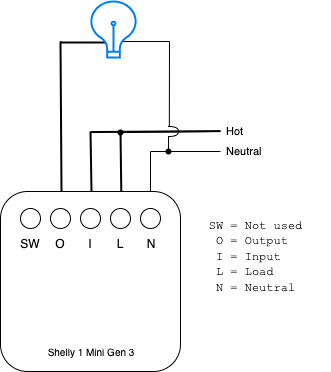
First up, I needed to wire up a Shelly. All of the diagrams I could find assumed you were using these to control a light and you'd have a light switch in the system. I will not be using them that way. After some reading and tinkering, this is the way I wired up my Shelly without a light switch involved:
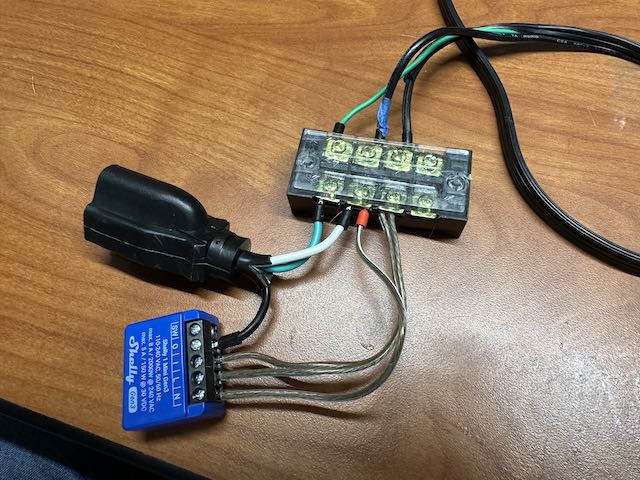
Here's a picture of it on my bench with some short extension cord pigtails:
This should be much neater and easier to package in a 3D printed case. Next up was getting MQTT to work.
Enable MQTT and get details about your Shelly
You'll need various details about your Shelly, such as the IP address, ID, and other information. The easiest way to find this info is to use the Shelly mobile app. With your Shelly wired up and powered on, it should show up in the app. You can tap into it to get these details. You'll need the ID to use with MQTT or the IP address to use with HTTP URLs to control the relay.
You'll also need to enable MQTT. I'd swear I did this from the app. But that was a while ago and other blogs say you have to do this via the web interface. In your browser, enter the IP address you got from the app. This will bring up the adminstration pages for your Shelly. The option to enable MQTT will be under the Internet & Security > Advanced - Developer Settings option.
(If you don't have or want to install the Shelly app, you can check your router to find the IP address the Shelly is using. Then, use the administration page as described above to find the Shelly ID.)
Controlling via MQTT
I found some web pages describing how to control the Shelly over MQTT. However, they were apparently all for older models because most of the directions in those guides failed to work for me. Here's what I was able to figure out on my own.
First, to make the later commands a bit easier, let's set some shell variables. This will work on Linux or Mac. I'm not sure about Windows, though perhaps if you use the Linux-like shell rather than the Command Prompt or PowerShell.
It's handy to open two terminal windows so that you can subscribe to the Shelly's topic and get error information in one and issue commands to the Shelly in another. So, open two terminals and enter the following in both.
export MQTT_SERVER="your_mqtt_server.local"
export MQTT_PORT=1883
export SHELLY_ID="shelly1minig3-dcda0ce69534"
Subscribe to the Shelly
In one of the terminals, subscribe to the Shelly's RPC topic like this:
mosquitto_sub -h ${MQTT_SERVER} -p ${MQTT_PORT} -t ${SHELLY_ID}/rpc
Or subscribe to all topics, like this:
mosquitto_sub -h ${MQTT_SERVER} -p ${MQTT_PORT} -t '#' -v
Any error messages will be output to this terminal, and you can see the commands that have been issued to the Shelly. This isn't required, but it can be helpful for debugging.
Get status info
In the second terminal, enter the following:
mosquitto_pub -h ${MQTT_SERVER} -p ${MQTT_PORT} -t ${SHELLY_ID}/rpc \
    -m '{"id":"Shelly.GetStatus", "src":"devices/'${SHELLY_ID}'/messages/events", "method":"Shelly.GetStatus"}'
The method parameter specifies which command you're executing on the Shelly. There are many you could use. Check the Shelly docs, but be aware that the docs cover all the Shelly models so some of the pages won't apply to the Mini 1 Gen 3 (or whatever you're using).
This will return a bunch of information about your Shelly. In fact, all the same info you were able to get from the app.
Turn on the relay
mosquitto_pub -h ${MQTT_SERVER} -p ${MQTT_PORT} -t ${SHELLY_ID}/rpc \
    -m '{"method": "Switch.Set", "params":{"id":0,"on":true}}'
The method in this case is Switch.Set. There's a Light.Set command as well, but it's not used or supported by the Mini 1 Gen 3. Next note the params key that has two additional sub-keys. The id parameter is required. Some Shelly models come with multiple relays, and this identifies which relay you're controlling. The Mini 1 Gen 3 has a single relay, but you still have to tell the Shelly that you're addressing the first one.
Finally, the on parameter specifies whether the relay should end up being on or off — true for on, false for off.
Turn off the relay
No surprise then that this command turns off the Shelly:
mosquitto_pub -h ${MQTT_SERVER} -p ${MQTT_PORT} -t ${SHELLY_ID}/rpc \
    -m '{"method": "Switch.Set", "params":{"id":0,"on":false}}'
Controlling via HTTP
You can also control the Shelly over HTTP, in other words with your browser. Let's say your Shelly is at 192.168.0.122. You can visit these URLs to control your Shelly:
- http://192.168.0.122/ — access the management interface
- http://192.168.0.122/relay/0?turn=on — turn on the Shelly
- http://192.168.0.122/relay/0?turn=off — turn off the Shelly
Additional Resources
- https://shelly.guide/webhooks-https-requests/
- https://shelly-api-docs.shelly.cloud/gen2/ComponentsAndServices/Mqtt
- https://kb.shelly.cloud/knowledge-base/shelly-1-mini-gen3#Shelly1MiniGen3-Basicwiringdiagrams
- https://sequr.be/blog/2020/10/getting-started-with-mqtt-and-home-assistant-and-shelly/ (This is one of the blogs that had info that didn't work for me. Still, you'll find some useful information here, plus Home Assistant integration info.)

